How to Personalize Emails in Gmail in 2026
Did you know that you can send personalized mass emails in Gmail? In today’s article, I’ll show you how to personalize emails in Gmail using mail merge with Gmail and Google Sheets.
The method I’ll teach you to personalize email in Gmail is completely free. Now, first off, what does mail merge even mean? Well, with mail merge, you can send out customized bulk email messages.
To use a real example, let’s say that you have a SaaS company. You can personalize bulk emails using mail merge with Gmail and Google Sheets. By connecting your spreadsheet to Gmail, you can automatically insert each recipient’s name, company, or custom details into your emails. Instead of sending generic messages, you send personalized emails like “Hello John Doe.”
Personalization in Gmail is especially great if you are running a service business with recurring billing.
How to Use Mail Merge with Gmail: A Step-by-Step Guide Using Gmail + Google Sheets
What Is Mail Merge?
Mail merge lets you send personalized bulk emails by automatically inserting custom details like names, due dates, or prices into each message. Instead of sending a generic email to everyone, each recipient receives a message tailored specifically to them.
Example: Instead of "Dear Customer," your email says "Hi John, your invoice for Website Design is due on March 15th."
Before you begin, make sure you have the following:
- A Google account (Gmail + Google Drive)
- A list of email recipients and their details
- A few minutes to set up the spreadsheet and email draft
Step 1: Get the Mail Merge Spreadsheet
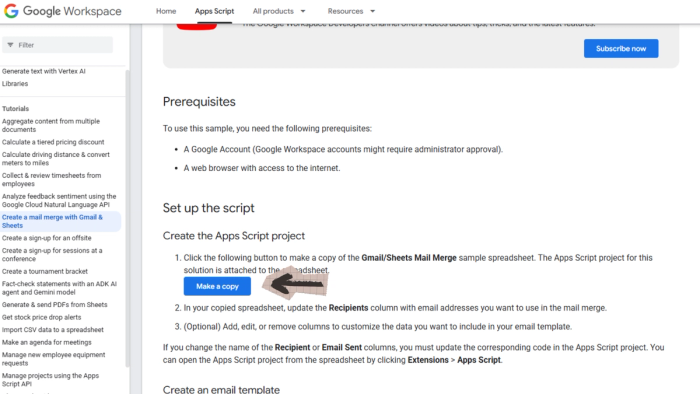
- Open your web browser and go to the Gmail/Google Sheets Mail Merge script page (Google Developer page for an example sheet).
- Scroll down until you see the Gmail Sheets Mail Merge spreadsheet link.
- Click the link. A prompt will appear asking if you want to copy it to your Drive.
- Click "Make a copy." The spreadsheet will open in Google Sheets.
💡 Tip: You can move this spreadsheet to any folder in your Google Drive by clicking the folder icon at the top.
Step 2: Set Up Your Google Spreadsheet
In this article, I’ll use Invoicing for Gmail for mass email sending with personalization. In this example, we’ll show how to send personalized invoices to multiple recipients efficiently.
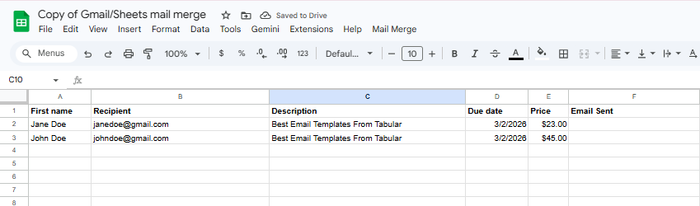
The spreadsheet contains column headers meaning that, each one is a field you can insert into your email. Each row represents one email to be sent.
For this Invoicing example we will use these columns:
- Recipient: The email address for each contact
- Email Sent: Automatically filled in when the email is sent successfully
- Description: The product or service description for the invoice.
- Due date
- Price
- First name
Customizing the Other Columns
- Delete any sample data already in the sheet.
- Remove columns you don't need by right-clicking the column header and selecting "Delete column."
- Rename columns to match the fields you want — for example, change "Discount Code" to "Due Date" or "Price."
- Add any extra columns you need by right-clicking and selecting "Insert column."
Note: Column names are case-sensitive and must match exactly what you type in your email draft using double curly brackets — e.g., {{First name}} must match a column called "First name".
Adding Your Data
Fill in the rows with your recipients' information. Each row = one email. Leave the "Email Sent" column blank — it will be filled in automatically.
Step 3: Create an Email Draft in Gmail
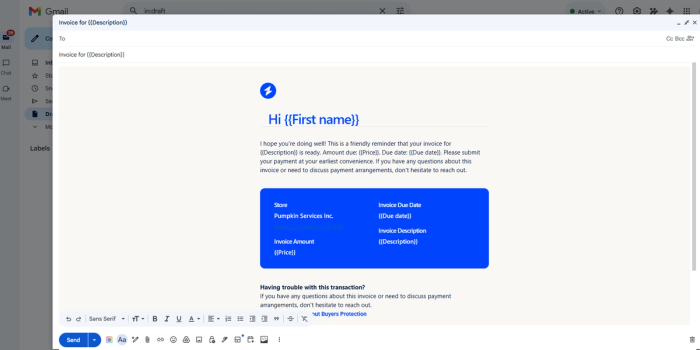
- Open Gmail and click "Compose" to create a new email.
- In the "To" field, type: {{Recipient}}
- Write your subject line, inserting custom fields using double curly brackets. For example: Your bill for {{Description}} is due on {{Due Date}}
- Write the body of your email, inserting fields wherever you want personalized content.
- Save the email as a draft. Do NOT send it yet.
- Copy the subject line — you will need it in the next step.
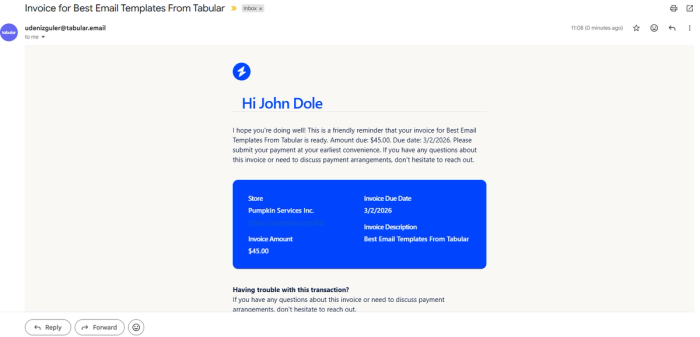
HTML email templates are essential for any business that wants to appear professional. In this example, I’ll use one of the templates from Tabular’s free email templates gallery. You can select the template that best fits your business and use case, customize it easily using Tabular’s user-friendly email builder, and export it as HTML.
If you’re not familiar with the process of using HTML templates in Gmail, I suggest checking our other articles: How to Create an Email Template in Gmail and How to Import HTML Emails to Gmail.
💡 Tip: To avoid typos, go back to your spreadsheet, copy the column name exactly, and paste it between {{ }} in your email.
Step 4: Run the Mail Merge
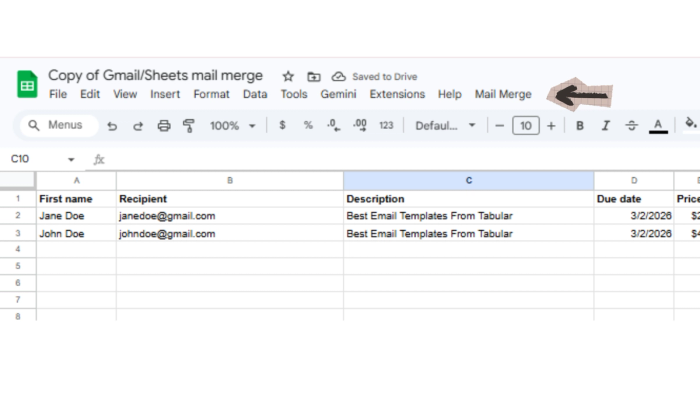
- Go back to your Google Sheets spreadsheet.
- In the top menu, click "Mail Merge," then click "Send Emails."
- A prompt will appear asking for authorization. Click "Continue" and sign in with your Google account.
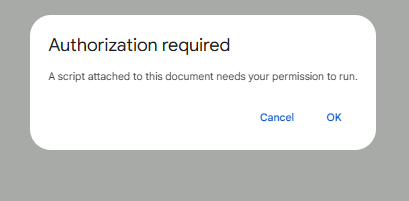
- Click "Allow" to grant the script permission to send emails on your behalf.
I want to remind you that this is an official script published on Google’s own developer platform. This authorization is crucial for the script to work. Later, I’ll share the full script and show you how to customize it, but for now, just accept everything.

- Go to "Mail Merge" > "Send Emails" again.
- A prompt will ask for the subject line of your Gmail draft. Paste in the subject line you copied earlier.
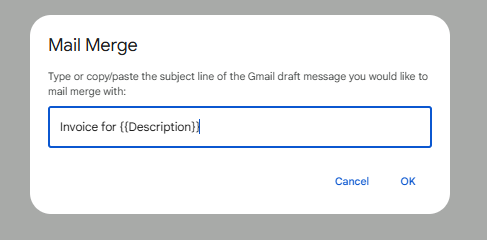
- Click "OK." The script will run and send your emails.
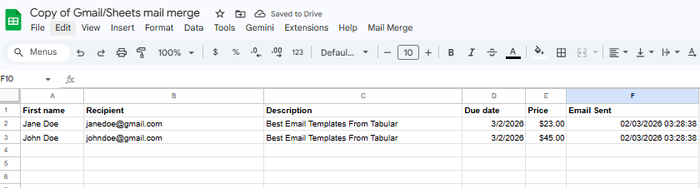
Step 5: Confirm Your Emails Were Sent
After the script finishes, check the "Email Sent" column in your spreadsheet. Each row should show a timestamp confirming when the email was delivered.
Best Practice: Always send a test email to yourself first with one row of sample data. This lets you verify that all fields are inserting correctly before sending to your full list.
Advanced Options
You can use Google Sheets to send personalized mass emails in Gmail. Simply erase the dates in the “Email Sent” column and run the script again. It’s a great solution for monthly billing, expenses, and recurring emails, and it offers a free option for businesses.
We use the script published on Google’s Developer Platform, but you can also customize it to fit your needs. To do that, go to the sheet you just created, click Extensions > Apps Script, and make your changes. After you’re done customizing, click Deploy.

Here is the full script:
// To learn how to use this script, refer to the documentation:
// https://developers.google.com/apps-script/samples/automations/mail-merge

/*
Copyright 2022 Martin Hawksey

Licensed under the Apache License, Version 2.0 (the "License");
you may not use this file except in compliance with the License.
You may obtain a copy of the License at

    https://www.apache.org/licenses/LICENSE-2.0

Unless required by applicable law or agreed to in writing, software
distributed under the License is distributed on an "AS IS" BASIS,
WITHOUT WARRANTIES OR CONDITIONS OF ANY KIND, either express or implied.
See the License for the specific language governing permissions and
limitations under the License.
*/

/**
 * @OnlyCurrentDoc
 */

/**
 * Change these to match the column names you are using for email
 * recipient addresses and email sent column.
 */
const RECIPIENT_COL = "Recipient";
const EMAIL_SENT_COL = "Email Sent";

/**
 * Creates the menu item "Mail Merge" for user to run scripts on drop-down.
 */
function onOpen() {
  const ui = SpreadsheetApp.getUi();
  ui.createMenu("Mail Merge").addItem("Send Emails", "sendEmails").addToUi();
}

/**
 * Sends emails from sheet data.
 * @param {string} subjectLine (optional) for the email draft message
 * @param {Sheet} sheet to read data from
 */
function sendEmails(subjectLine, sheet = SpreadsheetApp.getActiveSheet()) {
  // option to skip browser prompt if you want to use this code in other projects
  let processedSubjectLine = subjectLine;
  if (!processedSubjectLine) {
    processedSubjectLine = Browser.inputBox(
      "Mail Merge",
      "Type or copy/paste the subject line of the Gmail " +
        "draft message you would like to mail merge with:",
      Browser.Buttons.OK_CANCEL,
    );

    if (processedSubjectLine === "cancel" || processedSubjectLine === "") {
      // If no subject line, finishes up
      return;
    }
  }

  // Gets the draft Gmail message to use as a template
  const emailTemplate = getGmailTemplateFromDrafts_(processedSubjectLine);

  // Gets the data from the passed sheet
  const dataRange = sheet.getDataRange();
  // Fetches displayed values for each row in the Range HT Andrew Roberts
  // https://mashe.hawksey.info/2020/04/a-bulk-email-mail-merge-with-gmail-and-google-sheets-solution-evolution-using-v8/#comment-187490
  // @see https://developers.google.com/apps-script/reference/spreadsheet/range#getdisplayvalues
  const data = dataRange.getDisplayValues();

  // Assumes row 1 contains our column headings
  const heads = data.shift();

  // Gets the index of the column named 'Email Status' (Assumes header names are unique)
  // @see http://ramblings.mcpher.com/Home/excelquirks/gooscript/arrayfunctions
  const emailSentColIdx = heads.indexOf(EMAIL_SENT_COL);

  // Converts 2d array into an object array
  // See https://stackoverflow.com/a/22917499/1027723
  // For a pretty version, see https://mashe.hawksey.info/?p=17869/#comment-184945
  const obj = data.map((r) =>
    heads.reduce((o, k, i) => {
      o[k] = r[i] || "";
      return o;
    }, {}),
  );

  // Creates an array to record sent emails
  const out = [];

  // Loops through all the rows of data
  obj.forEach((row, rowIdx) => {
    // Only sends emails if email_sent cell is blank and not hidden by a filter
    if (row[EMAIL_SENT_COL] === "") {
      try {
        const msgObj = fillInTemplateFromObject_(emailTemplate.message, row);

        // See https://developers.google.com/apps-script/reference/gmail/gmail-app#sendEmail(String,String,String,Object)
        // If you need to send emails with unicode/emoji characters change GmailApp for MailApp
        // Uncomment advanced parameters as needed (see docs for limitations)
        GmailApp.sendEmail(row[RECIPIENT_COL], msgObj.subject, msgObj.text, {
          htmlBody: msgObj.html,
          // bcc: 'a.bcc@email.com',
          // cc: 'a.cc@email.com',
          // from: 'an.alias@email.com',
          // name: 'name of the sender',
          // replyTo: 'a.reply@email.com',
          // noReply: true, // if the email should be sent from a generic no-reply email address (not available to gmail.com users)
          attachments: emailTemplate.attachments,
          inlineImages: emailTemplate.inlineImages,
        });
        // Edits cell to record email sent date
        out.push([new Date()]);
      } catch (e) {
        // modify cell to record error
        out.push([e.message]);
      }
    } else {
      out.push([row[EMAIL_SENT_COL]]);
    }
  });

  // Updates the sheet with new data
  sheet.getRange(2, emailSentColIdx + 1, out.length).setValues(out);

  /**
   * Get a Gmail draft message by matching the subject line.
   * @param {string} subject_line to search for draft message
   * @return {object} containing the subject, plain and html message body and attachments
   */
  function getGmailTemplateFromDrafts_(subject_line) {
    try {
      // get drafts
      const drafts = GmailApp.getDrafts();
      // filter the drafts that match subject line
      const draft = drafts.filter(subjectFilter_(subject_line))[0];
      // get the message object
      const msg = draft.getMessage();

      // Handles inline images and attachments so they can be included in the merge
      // Based on https://stackoverflow.com/a/65813881/1027723
      // Gets all attachments and inline image attachments
      const allInlineImages = draft.getMessage().getAttachments({
        includeInlineImages: true,
        includeAttachments: false,
      });
      const attachments = draft
        .getMessage()
        .getAttachments({ includeInlineImages: false });
      const htmlBody = msg.getBody();

      // Creates an inline image object with the image name as key
      // (can't rely on image index as array based on insert order)
      const img_obj = allInlineImages.reduce((obj, i) => {
        obj[i.getName()] = i;
        return obj;
      }, {});

      //Regexp searches for all img string positions with cid
      const imgexp = /<img.*?src="cid:(.*?)".*?alt="(.*?)"[^\>]+>/g;
      const matches = [...htmlBody.matchAll(imgexp)];

      //Initiates the allInlineImages object
      const inlineImagesObj = {};
      for (const match of matches) {
        inlineImagesObj[match[1]] = img_obj[match[2]];
      }

      return {
        message: {
          subject: subject_line,
          text: msg.getPlainBody(),
          html: htmlBody,
        },
        attachments: attachments,
        inlineImages: inlineImagesObj,
      };
    } catch (e) {
      throw new Error("Oops - can't find Gmail draft");
    }

    /**
     * Filter draft objects with the matching subject linemessage by matching the subject line.
     * @param {string} subject_line to search for draft message
     * @return {object} GmailDraft object
     */
    function subjectFilter_(subject_line) {
      return (element) => {
        if (element.getMessage().getSubject() === subject_line) {
          return element;
        }
      };
    }
  }

  /**
   * Fill template string with data object
   * @see https://stackoverflow.com/a/378000/1027723
   * @param {string} template string containing {{}} markers which are replaced with data
   * @param {object} data object used to replace {{}} markers
   * @return {object} message replaced with data
   */
  function fillInTemplateFromObject_(template, data) {
    // We have two templates one for plain text and the html body
    // Stringifing the object means we can do a global replace
    let template_string = JSON.stringify(template);

    // Token replacement
    template_string = template_string.replace(/{{[^{}]+}}/g, (key) => {
      return escapeData_(data[key.replace(/[{}]+/g, "")] || "");
    });
    return JSON.parse(template_string);
  }

  /**
   * Escape cell data to make JSON safe
   * @see https://stackoverflow.com/a/9204218/1027723
   * @param {string} str to escape JSON special characters from
   * @return {string} escaped string
   */
  function escapeData_(str) {
    return str
      .replace(/[\\]/g, "\\\\")
      .replace(/[\"]/g, '\\"')
      .replace(/[\/]/g, "\\/")
      .replace(/[\b]/g, "\\b")
      .replace(/[\f]/g, "\\f")
      .replace(/[\n]/g, "\\n")
      .replace(/[\r]/g, "\\r")
      .replace(/[\t]/g, "\\t");
  }
}
Available Settings
| BCC | Blind carbon copy someone on all emails — remove the // before the BCC line and add the address. |
|---|---|
| CC | Carbon copy someone on all emails — remove the // and add the CC address. |
| From Name | Set a display name for the sender (e.g., "Kevin's Cookie Company"). |
| Reply-To | Set a display name for the sender (e.g., "Kevin's Cookie Company"). |
| Attachments | Attach a file to the email from your Gmail draft — the attachment will be included in all merge emails. |
If you don’t know these terms, I suggest you read our article on the parts of an email.
Email Sending Limits
Be aware of the daily email limits when using this method:
Daily Email Limit
Free Gmail Account: Up to 100 emails/day
Google Workspace (Paid): Up to 1,500 emails/day
For larger volume email campaigns, consider a dedicated email marketing platform.
Final Words
Personalizing emails in Gmail using mail merge with Google Sheets is a powerful way to engage your audience and save time. By automatically inserting recipient-specific details, you move beyond generic messages and create emails that feel personal and relevant. This approach is especially valuable for service-based businesses, invoicing, or any recurring communications where personalization builds trust and improves response rates.
Using HTML email templates further elevates your brand’s professionalism and visual appeal. Well-designed templates not only make your emails look polished but also reinforce brand identity, ensuring that your messages stand out in crowded inboxes.
With Tabular's drag and drop email template generator, you can easily create fully customizable responsive HTML email templates without any coding. Tabular’s drag-and-drop interface allows you to design responsive emails that work seamlessly across devices and email clients, helping you combine personalization with visually engaging content.
Quick Reference Checklist for Personalizing Emails in Gmail
- Copy the Gmail Sheets Mail Merge spreadsheet to your Google Drive
- Set up columns: Keep Recipient and Email Sent; customize the rest
- Add your recipient data row by row
- Write your email draft in Gmail using {{Column Name}} for each field
- Copy the subject line of your draft
- In Google Sheets, go to Mail Merge > Send Emails
- Authorize the script and paste in your subject line
- Check the Email Sent column and your inbox to confirm success