HTML Email Starter Template With Copy-Paste Code
If you're building HTML emails, the fastest way to ship something that renders correctly across Gmail, Outlook, Apple Mail, Yahoo, and every quirky inbox in between is to start with a clean html email starter template. This guide gives you a minimal copy-paste starter, walks you through every part of the boilerplate, and ends with two simple example templates you can use as references.
Both example designs were built with Tabular's email builder, so if you'd rather skip the hand-coding, you can find the same boilerplate, plus hundreds of ready-to-use designs, inside Tabular's email template gallery.
What you'll get from this article:
- A copy-paste html email starter template that works across all major email clients
- A breakdown of every part of the html email starter code so you understand what each line does
- A step-by-step explanation of how to build your own html email starter boilerplate from scratch
- Two simple HTML email templates you can use as visual references
- Tips on extending the html email base template for real-world projects
- Internal links to deeper guides on width, DOCTYPE, and Gmail rendering
Why You Need an HTML Email Starter Template
Email isn't web. Browsers have largely converged on standards; email clients haven't. Outlook on Windows still uses Microsoft Word's rendering engine for HTML, Gmail strips <style> tags in some contexts, Apple Mail handles modern CSS beautifully while older Outlook versions ignore half of it.
A solid html email starting template solves the boring 80% for you: the DOCTYPE, the essential meta tags, the table-based layout, and the one Outlook conditional that prevents your images from being scaled up to absurd sizes. You write content; the boilerplate handles compatibility.
If you're brand new to the format, start with our primer on how to create an HTML email and then come back here for the code.
The HTML Email Starter Template (Copy & Paste)
Here's a truly minimal html email starter template — no fluff, no edge-case overrides you'll never need, just the essentials that every email actually requires. You can copy this, paste it into any editor, drop in your content, and have a working email in under a minute.
<!--
* HTML Email Starter Template
* Built with Tabular — https://tabular.email
-->
<!DOCTYPE html>
<html lang="en" xmlns="http://www.w3.org/1999/xhtml" xmlns:o="urn:schemas-microsoft-com:office:office">
<head>
  <meta charset="UTF-8">
  <meta name="viewport" content="width=device-width, initial-scale=1">
  <meta http-equiv="X-UA-Compatible" content="IE=edge">
  <title></title>

  <!--[if mso]>
  <xml>
    <o:OfficeDocumentSettings>
      <o:PixelsPerInch>96</o:PixelsPerInch>
    </o:OfficeDocumentSettings>
  </xml>
  <![endif]-->

  <style>
    body { margin: 0; padding: 0; }
    table { border-collapse: collapse; }
    img { display: block; border: 0; }
  </style>
</head>

<body style="margin:0;padding:0;background-color:#F5F5F5;">
  <table role="presentation" width="100%" cellpadding="0" cellspacing="0" border="0">
    <tr>
      <td align="center" style="padding:40px 0;">

        <!-- Container -->
        <table role="presentation" width="600" cellpadding="0" cellspacing="0" border="0"
               style="width:600px;max-width:600px;background-color:#FFFFFF;">
          <tr>
            <td style="padding:40px;font-family:Arial,Helvetica,sans-serif;color:#333333;">

              <!-- Your content goes here -->
              <h1 style="margin:0 0 16px 0;font-size:24px;line-height:32px;color:#111111;">
                Your headline
              </h1>
              <p style="margin:0;font-size:15px;line-height:24px;">
                Your message body goes here. Replace this with your content.
              </p>

            </td>
          </tr>
        </table>

      </td>
    </tr>
  </table>
</body>
</html>
That's the entire boilerplate. Drop your content into the inner <td> and you have a working email. Everything else — buttons, columns, images, dark mode, advanced mobile styles — is something you add when you actually need it, not something you carry around as dead weight from day one.
Anatomy of the HTML Email Starter Template
Now let's break down what each part of this html email starter code is actually doing. Understanding the pieces is what lets you extend the boilerplate confidently instead of copy-pasting blindly.
1. The DOCTYPE
<!DOCTYPE html>
The HTML5 DOCTYPE is the simplest option and is supported by every modern email client. Some developers still prefer XHTML 1.0 Transitional for tighter Outlook control — both are valid choices. We have a deeper dive on this trade-off in Outlook HTML rendering and DOCTYPE.
2. The HTML namespace
<html lang="en" xmlns="http://www.w3.org/1999/xhtml" xmlns:o="urn:schemas-microsoft-com:office:office">
The xmlns:o namespace lets you use the Office-specific XML inside the MSO conditional below. The lang attribute is good for accessibility and screen readers.
3. The meta tags
<meta charset="UTF-8">
<meta name="viewport" content="width=device-width, initial-scale=1">
<meta http-equiv="X-UA-Compatible" content="IE=edge">
Charset declares the encoding (UTF-8 for emoji and special characters), viewport tells mobile clients how to scale, and X-UA-Compatible tells Outlook web to use its latest rendering engine.
4. The MSO conditional
<!--[if mso]>
<xml>
<o:OfficeDocumentSettings>
<o:PixelsPerInch>96</o:PixelsPerInch>
</o:OfficeDocumentSettings>
</xml>
<![endif]-->
This block is invisible to every client except Outlook on Windows. It tells Word's rendering engine to stop scaling your images at 120 DPI — without it, your html email base template will look broken in Outlook even if it's perfect everywhere else. This is the single most important line of "Outlook-only" code you can include.
5. The minimal CSS reset
body { margin: 0; padding: 0; }
table { border-collapse: collapse; }
img { display: block; border: 0; }
Three rules. That's it. Body margin gets reset because some clients add default margins, table border-collapse prevents double-border issues, and display: block on images removes the small gap that browsers add below inline images. You can add more resets later if you actually run into a specific bug — but you don't need fifty lines of defensive CSS to send a working email.
6. The table-based layout
Email layouts use nested <table> elements because Outlook on Windows doesn't reliably support modern CSS layout. The pattern in the starter is:
- An outer 100%-wide table that fills the viewport and holds the background color
- An inner 600px container table that holds your content
For a longer discussion of why 600px is the standard and what happens if you push wider, see our guide to email template width and height.
7. Inline styles for everything else
Notice how the colors, fonts, and padding live in style attributes on each element rather than in a CSS class. That's because Gmail strips or scopes <style> blocks in many contexts. Inlining makes your email portable. For a starter this small, you can write the styles inline by hand. For larger templates, tools like Juice or Premailer automate it — and if you use Tabular, inlining happens automatically on export.
How to Build Your Own HTML Email Starter Template
If you want to build a html email starter boilerplate from scratch instead of copy-pasting, here's the process:
- Step 1 — Start with the DOCTYPE and HTML tag. Use HTML5 DOCTYPE (or XHTML if you prefer) and include the Office namespace on the <html> tag.
- Step 2 — Add the essential meta tags. Charset, viewport, and X-UA-Compatible. That's all you need to start.
- Step 3 — Add the MSO conditional. The PixelsPerInch block fixes Outlook's image scaling problem.
- Step 4 — Write a minimal CSS reset. Three rules: zero body margin, table border-collapse, block-level images. Add more only when you hit a specific bug.
- Step 5 — Build the table skeleton. Outer wrapper table at 100% width for the viewport background, inner container at your fixed width (600px is the safe default) for your content.
- Step 6 — Inline your styles. Put fonts, colors, padding, and margins as style attributes directly on each element.
- Step 7 — Add complexity only as needed. Buttons, multi-column layouts, mobile media queries, dark mode tweaks — add these when your design actually needs them, not preemptively. A bloated html email basic template is harder to debug than a small one you understand fully.
- Step 8 — Test, test, test. Send the email to yourself in Gmail, Outlook (desktop and web), Apple Mail, and on iOS and Android. For Gmail specifically, see how to insert HTML into Gmail to test your code without needing a full ESP.
Free Email Templates
Below are two HTML email templates that build on the starter above. Each one is a real, production-style design — feel free to use them as a reference for your own work.
Email 1 — Email Verification Template
A centered, narrow (~400px) layout with a friendly heading, a single CTA, and a soft footer note. This is the canonical "verify your email" pattern: small, focused, single-action. The container is narrower than the standard 600px because narrower layouts work well for transactional emails where you want the user to do exactly one thing.
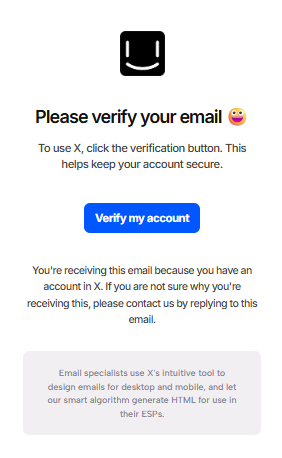
The unique design touches versus the starter: a circular logo at the top, generous vertical breathing room around the heading and CTA, and a light gray footer card with helper text that quietly explains why the user is receiving the email.
This template is ideal when you want to reduce visual noise and drive clicks on a single button. If you want to skip building it from scratch, you can grab this exact Html email template inside Tabular — open it, swap in your branding, and export the production code in seconds. Tabular's template gallery is a good place to start whenever you need a head-start on a new email design instead of rebuilding the same patterns over and over.
Email 2 — Account Confirmation Template
A wider (600px) left-aligned layout with a heading rule, a supporting paragraph, a pill-shaped CTA, and a divider with branding and an unsubscribe link in the footer. This is the canonical "confirm your account" pattern — slightly more formal, more SaaS-y, and visually grounded by a subtle border under the heading.
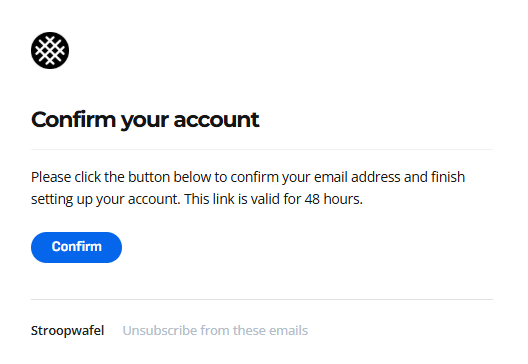
The unique design touches versus the starter: a 1px bottom border under the heading to create a section divider, a pill-radius button (40px) for a softer feel, and a footer row with brand name on one side and "Unsubscribe" on the other.
This layout works for confirmations, receipts, magic links, or any transactional message where you want a more product-grade feel. Tabular's gallery includes this exact Simple html email template along with hundreds of other designs — you can browse the gallery, pick one that matches your brand, and customize colors, fonts, and copy in the visual editor before exporting clean HTML.
Build HTML Emails Faster with Tabular
Hand-coding emails is satisfying, but it's also slow and unforgiving — one missing cellspacing="0" or one misaligned <td> and your design falls apart in Outlook. Tabular is a visual email builder that produces clean, production-grade HTML using the same minimal boilerplate covered in this article. You design in a drag-and-drop editor, hit export, and get HTML that works across every major client out of the box.
Build beautiful HTML emails in minutes
If you're new to HTML email development entirely, our walkthrough on how to create an HTML email is a good companion to this article — it covers the workflow from blank canvas to inbox.
Final Thoughts
A good html email starting template is the foundation of every reliable email program. Whether you copy the minimal boilerplate above, build your own from the step-by-step guide, or use Tabular to skip the boilerplate entirely, the principles are the same: keep it small, use tables for layout, inline your styles, include the MSO conditional, and test obsessively.
Start lean. Add complexity only when your design actually demands it. The cleanest emails almost always perform best — and the cleanest html email starter code is always the easiest to debug six months from now.